What's new

Sterling #S009

Brett Proctor

Well-known member
I've had a few people ask on the progress of the canopy arms so instead of up dateing the post I thought I'd start a build journal.

The arms are about 90% done. They took a little longer than anticipated. I didn't have the correct wire for welding chromoly and none of the welding shops here in town had any so I had to order it, plus I did some design changes as I got into it.
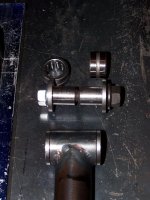
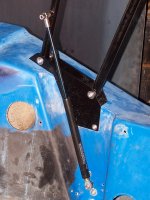
The arms are made from 1" .065 4130 chromoly and the ends are 1" .095 4130 chromoly machined for the needle bearings(22mmX14mm). I don't have a lathe(wish I did) so I used my mill. The inserts are machined from 1" 4130 chromoly. If I had to do it again I think I would use stainless steel for the inserts. The chromoly will rust with time but living in vegas I don't think that will be an issue.
The gas strut attachment points on the arms will have removable studs so they can be replaced if they should ever wear out(my stock ones were so worn out that someone used cotter keys intead of the nuts to hold them on because the threads were worn down to nothing.(I'm waiting on the studs right now).
Well thats it for the arms. If I didn't cover something let me know and I'll update the post.

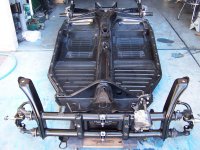
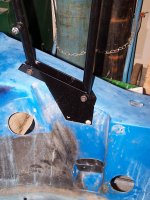
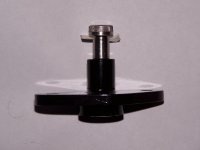
The pictures show various stages of the build including the jig I made. I machined where the ends go creating a socket in the jig. The ends fit in the machined part and are then bolted in place to make sure they don't go anywhere.

Later
Brett
 

Attachments

  • 000_0208.jpg
    000_0208.jpg
    177.5 KB · Views: 1,000
  • 000_0209.jpg
    000_0209.jpg
    136 KB · Views: 540
  • 000_0210.jpg
    000_0210.jpg
    135.1 KB · Views: 546
  • 000_0211.jpg
    000_0211.jpg
    153.9 KB · Views: 573

kuehjo

New member
Those look VERY nice - I'm not nearly the fabricator, but I hope to learn!

Hey - I'm no expert, but I don't think rust will be a big issue anyways, reagrdless of where you live - you're going to have them greased, and that should be pretty rust-prohibitive... I think they look great, and this kind of project gets me excited to learn how to use some of these tools!
 
Last edited:

Brett Proctor

Well-known member
Here are some pics of #S009
Someone decided to spray gray primer over the old paint with no prep. So I'm sanding the paint down to the original blue gel coat and fixing any imperfections to the body and then it will get painted.

The pan was rusted to a point where I wasn't happy with it so that got a rebuilding also. When I was cleaning out the center tunnel of the pan I found 4 dead mice inside of it.To bad it wasn't money, I could of used that.

Brett
 

Attachments

  • 100_3712.jpg
    100_3712.jpg
    126.7 KB · Views: 558
  • 000_0219.jpg
    000_0219.jpg
    106.4 KB · Views: 619
  • 000_0215.jpg
    000_0215.jpg
    181.9 KB · Views: 636
Last edited:

Brett Proctor

Well-known member
The front end rebuild is finally finished
New tie rod ends(for such an easy item it was the biggest pain)disc brake conversion, new torsion arms w/ball joints, new torsion leafs(as simple as they are, They were a pain also. I had to mix and match my old with the new to come up with something that worked), new steering box and pitman arm(another fun story), and height adjusters installed.

I also found a guy here in town that has parts for the transaxle so I can rebuild that next. The guy at the transmission shop said that instead of going to the after market side plates use one from a super beetle there stonger and cost less.

Started to convert the rear stub axles from type 1 CV's to Type 2 CV's and replaced the axle bearings and spacers.

I'm actually showing some progress.

Later
Brett
 

Brett Proctor

Well-known member
Spent the whole day making one bracket.
As with the canopy lifting arms I saw a better way to build the lower gas strut brackets. I didn't have a plan but I knew what I wanted to do. So it took a while before I decided how I wanted to do it.

The brackets are formed to the shape of the mounting area(wedge shape) so the load is not transmitted to the bolts only but to the sides also. additional material was added to areas that I thought could use it.

I made a pattern of the one side to duplicate it for the other side but the other side is not the same so I have another day to spend bending and cutting and welding.

Later
Brett
 

Attachments

  • 000_0221.jpg
    000_0221.jpg
    152.2 KB · Views: 533
  • 000_0222.jpg
    000_0222.jpg
    165.8 KB · Views: 552
  • 000_0223.jpg
    000_0223.jpg
    124.7 KB · Views: 627

Brett Proctor

Well-known member
Well I made a couple different brake arms and didn't like any of them. I ended up with this one. It uses the stock arm the pedal is just different. I think it looks a little sportier than stock. I had some 304 perforated stainless steel laying around and used that for the cover piece. If that proves to be too slippery for the foot I'll replace the stainless steel with that anti slip tape. The clutch is just about done(I wasted alot of time experimenting) and then I'll make the gas pedal.
 

Attachments

  • 000_0226.jpg
    000_0226.jpg
    149 KB · Views: 615

Brett Proctor

Well-known member
Thanks Tullio. I made up a few different ones but they didn't look right using the existing configuration of the stock pedals so I settled on just changeing the pedal part. I was going for just a bolt on change.

Well #S009 gets new brake lines, disk brakes(front and rear), and a rebuilt pedal assy(I didn't have the stock pedal stop so I made one out of a piece of aluminum).

Next I think I'll bolt the pan back to the body and start looking for some seats and then check out the location for the shifter and emergency brake lever. We'll see how it goes, I'm still looking for a subaru motor and the transaxle isn't back together yet either so maybe I'll do the transaxle next. Lots of things still to do.

Later
Brett
 

Attachments

  • 000_0228.jpg
    000_0228.jpg
    155.6 KB · Views: 640

Brett Proctor

Well-known member
Body is back on the chassis. New sway bar(after market) hits the body(had to remove it) so I'll have to do some tweeking(bending) to make it fit.

Height adjuster adusting screws hit the body also so I had to make holes for them to clear(not happy with that).

Body was not square to the chassis(front was 3/4" out) using the existing mounting holes so I had to make adjustments to make it fit square.

Lower body panels needed to be trimed to clear the new lowered seating area and new holes drilled.

Worked on the lower gas strut brackets for the canopy most of the day. Not happy with the first ones I made so I'm making new ones(different design this set is out of aluminum).

Tomorrow the canopy should be bolted back on and the struts operational.

Monday or tuesday I'll order the new rims from center line. I'm figureing on a 17" rim with it being 7" or 8" wide front and rear.

Still not sure about the back spacing though.

Thats it in a nut shell

Brett
 

letterman7

Honorary Admin
Sounds like progress, Brett. You might regret the sway bar though. The cars are light enough that rarely any additional torsion is needed in the front. You may find the handling choppy at best. And you are right - most Sterling bodies are not equally dimensional, and many are that far out when mounted to the chassis. Most people wouldn't see that (nor would care); the guys that built the Nova said that everything had to be hand sculpted for the initial plug, so there were some definate variances!
 

Brett Proctor

Well-known member
Along with the the body not being symmetrical I'm not impressed with the fiberglass work. When they sprayed it on they did a poor job of getting it even. Thickness varies all over. I know with a chopper gun things will be a little inconsistant but on this car its alot. Did they hand lay any of these??

I figure that this one being #009 they were still learning. Canopy doesn't follow the body lines either, but I've looked at others and see the same thing. To bad they didn't care more to get things right. The car definitely made its mark in history.

Yup things are starting to look promising.
Still have the interior to do, get new wiring harness, find seats, get an engine, put the tranny back together, a little body work, and paint. Thats the major stuff(I think)

Maybe this time next year I'll have it registered. I got the title in the mail today (changed over to my name) so at least I know its mine now for sure.

Well Rick have a good one. I'm going to start getting ready for todays fun. My main thing today is to get the canopy to open and close on its own. Sounds easy right. We'll see how it goes.

Later
Brett
 

Brett Proctor

Well-known member
Well it didn't happen. It wasn't till around noon that I finally came up with a bracket design for the lower mounting bracket for the gas strut that I was happy with. From then it took me the rest of the day to machine one. So monday I'll work on the second one and maybe it will be finished and I can install the canopy top.
I promise, it looks alot better than the one I posted earlier. I looked at that picture and wondered what was I thinking. I can do alot better.

You guys should of said something. Don't cut me no slack. That first bracket looked like sh*t.

I'll post a picture when I get it installed.

Later
Brett
 
Last edited:

Brett Proctor

Well-known member
I've looked around and cann't find anything on the lower mounting location of the gas lifting strut. Is there a specific spot where it is suppose to go? Is it suppose to have any preload when in the up position?? Anything I should know before I bolt it up??

Brett
 

Brett Proctor

Well-known member
Well this is what I came up with for mounting the lower section of the gas strut. The aluminum one that I was thinking of doing didn't work either so I came up with this design.
Its been on for a few days now and seems to be working ok. It bolts to the back side of the body as you can see and it has alot cleaner looking install(I think) I used a shoulder bolt to retain the strut. We'll see if it holds up.

The new lifting arms are working out also. The canopy has no movement at all in it, just staight up and down. No wooble at all(I think thats good)
 

Attachments

  • 000_0262.jpg
    000_0262.jpg
    57.7 KB · Views: 479
  • 000_0271.jpg
    000_0271.jpg
    129.5 KB · Views: 449
  • 000_0272.jpg
    000_0272.jpg
    143 KB · Views: 527
Top