What's new

Another Nova from across the pond saying Hi!

islandman

Member
Hi,

Whilst I have skulked around this site for a while I never fully introduced myself. I mainly post on the Euro-Nova website in the UK.

Well may name is David and I’ve owned my Nova for 24 years (yes you heard right), my car is still in the UK but I live in Singapore so as you can imagine progress has been somewhat slow lately. Its been on and off the road throughout that period as I did a number of modifications over the years and always tried to keep it roadworthy whilst I evolved it to where I wanted it to be.

I have dug out a selection of pictures as I know most of us would really rather see the pictures than read about what has been done! So here goes…..

This is the car as I purchased it in 1989


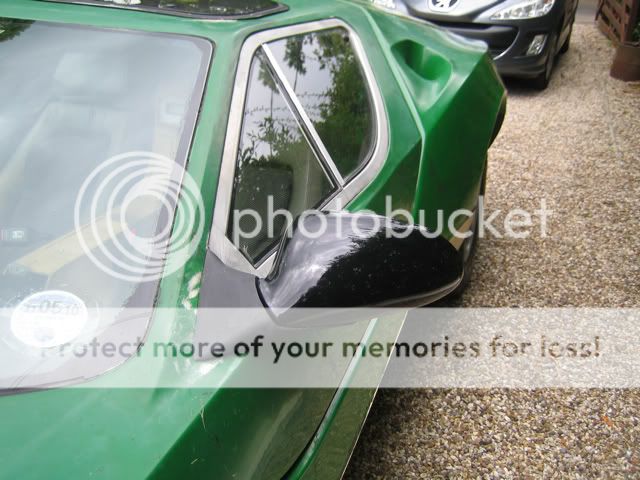
Then the modification journey started…. Opening side windows, pop-up lights, rack and pinion steering, disk brakes all round, new engine cover, new rear end, aircon, engine swaps (currently its 4th!), custom mirror mounts, etc..too many things to list.


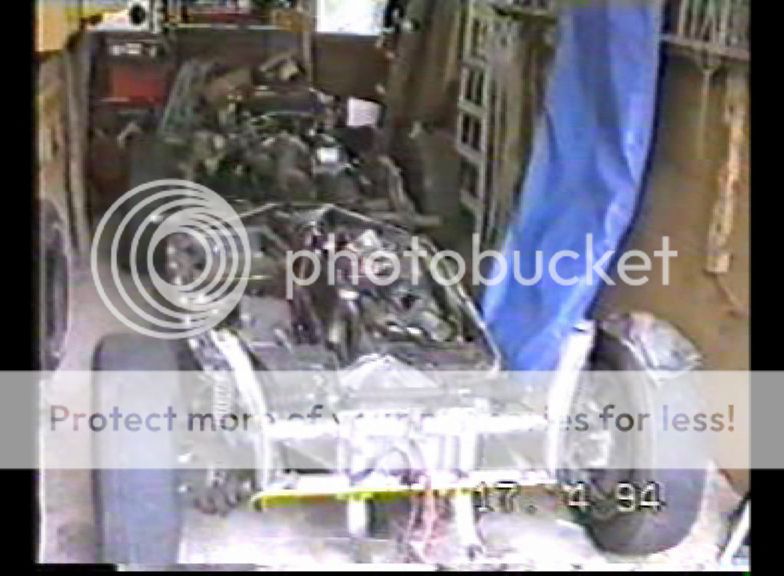
Then I ended up cutting the chassis in half and shortening it (it was originally two mated together, but the wrong dimensions to get IRS).


Cut some seats in half to make narrower to fit the dropped floor pans


Made a new exhaust setup to match the water cooled engine


got it ready and took it off for paint,….


Got it back from paint ….after two years!!! Don’t ask long painful story :eek:(


Started the reassembly….


Back from a few final paint touch ups that were not completed


some more assembly to do on the rear, grills etc.. to be fitted


It will probably be next year now before I get to play with it again and continue the assemble and finish / redo the interior


Oh yeah and I do have another complete kit that I rescued awaiting a build at some time


Flyer615

New member
Welcome to the forum, islandman. That's a good looking project you've got going, there. Sometime, I'd like to see more details on the seat modification that you did, if you don't mind. Grab a pint and belly up to the workbench. :D
 

islandman

Member
Welcome to the forum, islandman. That's a good looking project you've got going, there. Sometime, I'd like to see more details on the seat modification that you did, if you don't mind. Grab a pint and belly up to the workbench. :D


As always a picture speaks a thousand words (well a video anyway *laugh*). Its a bit small but you can get the gist here

Narrowing Seats

There is also a bunch of others I've done over the years here :

Nova Videos

Enjoy!
 

Peter

Active member
Been said on lots of forums, " Oh, flipping 'eck, Peter is on here too", LOVE IT!
Great to see you on here too mate.
 

islandman

Member
A few updates as I made my annual pilgrimage to the UK from Singapore to see my folks and work on the kit car
When I did a trial fit of the windscreen I found two problems. Firstly the bottom centre of the screen sat proud of the canopy. My previous screen did the same thing which was hidden by adding sealant to bridge the gap but it still didn’t look good and wasn’t great. The second problem which really surprised me was that the top right hand corner of the screen sat proud of the screen also!

I remembered a conversation that I had with Sam Cobley (previous Nova company owner) many years ago that he had a screen that sat proud at the corners. He told me he clamped the screen down with some wood on the outside and then left a fan heater inside the car facing the screen for several hours. Then when he took the braces off the screen had dropped nicely into position.

My thoughts are that the theory is sound as it is heat that forms the screens from flat glass in the first place, although I wasn’t sure you could get it hot enough without an oven.

Anyway I crossed my fingers and took the plunge, I’m really hoping I don’t come back to find a crack on my nice new screen!

A picture of the bottom of the screen sitting proud

screen12_zps4f5315cd.jpg


Clamped and weighed down with a fan heater inside…….now all I can do is wait!

screen14_zps12c8a141.jpg
 

islandman

Member
Well its good news and bad news!

After about 2 hours of the fan heater on the screen last night I decided not to take the weights off and baton to allow it to cool down first and then do it in the morning.


So this morning I eagerly went into the garage to take a look. I took the weight off the bottom of the screen and it had dropped, which was great ;o) although it could have gone down an extra couple of millimeters, but it was good enough


Then I took a look at the top left side which was the main problem as it was sitting about 10mm higher than canopy frame. This looked great and it dropped flush with the rest of the frame which is fantastic


Then I took a look at the screen as a whole and noticed a line on the top left corner, under further inspection my worst fears were confirmed, a crack!!! It seems the inside layer of the glass has cracked, although the top layer is intact. I can only imagine that it may have been caused by uneven cooling of the screen causing a stress crack


So I was crying into my cornflakes that morning
 

islandman

Member
I eventually asked my local windscreen fitters to repair the screen as it would take three weeks for a new screen and I was only in the country for two weeks. I went down the next day and took a look, they had injected some resin into the crack and whilst you could still see it if you looked hard it was sooooo much better than before. So I asked them to go ahead and bond it in, and I left to do some other errands.

The next day I called them to see if it was ready for collection, they said it was and that they had used a windscreen seal to make it look better. My heart sank as to be honest the majority of Nova’s I’ve seen that have had windscreen seals have tended to be large and thick sitting very noticeably proud of the body and looking somewhat agricultural. I was actually a bit P*&%d as I had told them just to bond it in and smooth the sealant around the edges.

So when I went to collect it I was very pleasantly surprised, the seal was neat, low profile and didn’t look out of place at all. It was a real bonus as it also hide where the screen was still very slightly raised at the font bottom edge, a real result!

Low profile windscreen seal


Overall windscreen seal

g
 

islandman

Member
I had the glass guys also cut new laminated glass for the front side light / indicators. All that was left to do was use the etching primer paint they had given me to create the obscuration band and some stripes for added styling.

First step was to put tape down ready to be cut out with a Stanley knife as a mask.


Then it was ready for the black etching primer to be applied


It’s amazing how fast this stuff dries, the finished article ready for bonding in


And the final product with the glass bonded into the Nova


and for the observant amongst you, no the lights are not fitted behind the glass yet, nor are the pop-ups in place….I’m still waiting to make an additional bracket to stop them moving around too much.
 

islandman

Member
The new wheel caps that I searched high and low for to find the right diameter nearly fitted perfectly, the help of a large rubber band around each one close to the hub stops them jiggling about as it effectively fills the 1mm gap. You can’t see the rubber band which is a big bonus. Sometimes I just love the simple solutions, I have my dad to thank for that suggestion.


islandman

Member
I also got around to a couple of other jobs I had been putting off.


Firstly covering the air escape holes I created in the top of the body under the bonnet to allow the hot radiator air out. I used wire mesh with a rubber seal on the rough edges.


Secondly, I finally got around to putting the roof seal on. I finally used Sikaflex 221 as the best option for sealant based on my glue / sealant tests. Unfortunately there was no way the seal would stay put whilst it cured, especially on the bends as it was just too rigid to conform. So I had to resort to using self tapping screws at the strategic stress points. Most of these were removed after the sealant fully cured (about two days), at which point there is nothing that will shift that seal.


I did bodge up the join on the top right corner of the canopy (that’s where the manual suggested starting), in hindsight it wasn’t the best place and I will need to do some more work bridging the gap in that area.

I will also need to add some D-Section seal under the lip of the standard seal on two small areas where the canopy rises at the sides as it doesn’t push far down enough to touch the body
 

islandman

Member
I also managed to get around to bonding in the front quarter light windows and sticking on the seal which is more cosmetic than anything, it was a real bugger to get right and I needed lots of acetone to clean off the sealant from the glass with my various attempts to get it to sit correctly and continuous repositioning. But I got there in the end… ;o)


The removable side windows also fitted with the opening catch and seal


islandman

Member
Inspired by an aussie Eureka (and Brett's fabrication work) I had seen I decided to have a go at making a cover for the windscreen wiper motor.
Here is the motor trial fitted.


I used a piece cut from a high density foam block to shape and form the buck


Here is the initial foam buck shaped to cover the motor


I ran out of time so unfortunately the rest will have to wait until my next trip
 

islandman

Member
When I closed the bonnet I found that the front edge was rubbing against the body. It seemed that the rams were pushing it forward and because the bolts into the side of the body only had a few millimeters of fiberglass in both the bonnets and body to go through it allowed the bolts to move to almost a 45 degree angle which effectively moved the bonnet 5mm forward hence the rubbing at the front.

So I started off by adding a fiberglass filler block to the bonnet interior recess so that the bolts would have to pass through at least 3cm of solid block that wouldn’t allow them to do anything but stay perpendicular to the side of the body.

I then used cut down rivnuts (uncompressed as I found these didn’t work very well in fiberglass) to provide a collar for the bolts to go through on both the bonnet and body. These were bonded in as well as painted black so they didn’t stand out.

You can’t see the fiberglass filler so well in the picture.


Here it is after being sprayed black to match the rest of the underside of the bonnet (or for my American cousins on this site, the Hood!)


This seemed to work well as it restored the required gap at the front of the bonnet.


Finally I used a rubber grommet between the bonnet and the body to hide the stainless steel hex cap bolt I used.


islandman

Member
The rear end fitted back on the body after the grills, lights and number plate fitted and wired in.


As usual in the UK it rained when I went to take the car on the trailer back to its storage


letterman7

Honorary Admin
My goodness you've been busy, David! Car looks great! Love the windshield molding and great idea on the vents underneath the bonnet.
 
Top